Saturday, August 31, 2013

Jōdo Shinshū Buddhist Temple and Ikkō-Ikki

Time to revisit another old project.  I was a pretty avid Warhammer Ancient Battles player and started collected samurai figures (I've got about 300 mostly unpainted figures stashed in the closet) for their Divine Wind supplement. Sadly WAB was shut down before they every released the supplement, so this project has been gathering dust for years.  Now that Osprey is releasing their Ronin rules, I thought it might be a good idea to revisit what I had in my collection.

First up is a Buddhist temple complex I bought from John Jenkins Designs.  I bought mine unpainted and I remember it being quite a bit of work to get the resin in a state where primer and paint would stick.  However, the level of detail is fantastic and there were hardly any bubbles.  My only complaint was that the wall corners were not square and there was some warping on the front gate, making it difficult to get them to fit tightly.  I used plastic card under some of the wall sections to try and help, but as you can see below, it still isn't perfect.

I planned to have my battles between the forces of  Oda Nobunaga and the Ikkō-ikki, so I have styled my temples as belonging to Jōdo Shinshū  Buddhists. The mon and purple trim were taken from the American website of Jōdo Shinshū.
Jōdo Shinshū Buddhist temple
Main temple gate
Main temple building with the Jōdo Shinshū  Mon.  The writing on the placards comes from various prayers.
Rear of the temple
 To lead my Ikkō-Ikki, I painted a Perry miniature to look like Kennyo, head abbot of the fortress temple Ishiyama Hongan-ji.
Hongan-ji Kennyo 本願寺 顕如
 His clothing is based on an image I found in a Japanese history magazine about Oda Nobunaga.
Hongan-ji Kennyo 本願寺 顕如

 For his  Jōdo Shinshū Sōhei supporters, my figures are mostly a mix of Old Glory, TAG, and a single Perry figure.  During my travels in Japan looking for info on the Ikkō-Ikki (luckily I have a Japanese wife who is willing to humor me and provide translating support), images of Jōdo Shinshū monks generally showed them in darker colored robes rather than the oranges and yellows commonly seen on miniatures, so I have painted them accordingly.  However, I did take some liberty with the sashes to give them a bit more pop.  The figure with the banner is a poorly converted (I'm not that great with green stuff) Old Glory samurai, with the Buddhist prayer seen on the cover of Carol Richmond Tsang's, "War and Faith: Ikkō-Ikki in Late Muromachi Japan" written in by my wife.  This translates as, "Advance and be reborn in paradise; retreat and fall immediately into hell."
Jōdo Shinshū Sōhei
Beside monks, a significant number of farmers, merchants and samurai joined the Ikkō-Ikki movement as well, which I have pictured below.  The red flag is one flown by the Zempuki-ji Ikkō-Ikki at the siege of Ishiyama Hongan-ji (taken from Plate H in Stephen Turnbull's, "Japanese Warrior Monks AD 949-1603") .
Ikkō-Ikki
Ikkō-Ikki
These figures are also Old Glory, TAG and Perry.  The TAG and some of the Old Glory figures are actually from an earlier era in Japan, but I think they cam be slipped in without too big of an issue (though I wouldn't try to pull it off with some of the samurai figures).   

For painting guides, I used the Osaka Castle Museum's weapons and armor catalog, and the website of the Costume Museum in Kyoto.

Doctor Who: Silurians

Well, it's been a bit since my last post.  My long trusted camera for photographing miniatures went belly up earlier this month, and we just recently go a replacement, which I am trying out here with these newly painted Silurians from Doctor Who.
 Sadly, it doesn't seem to be able to focus as well as the last one when it comes to smaller objects (I had hoped to get some close ups), but I'll have to live with it.

OK, enough about the camera.  These Silurians are from the Black Tree Design range, which I go through their American office. I know some people have had hit or miss service from them, but I got my complete order (about 30 figures of various sorts) within about 2 1/2 weeks after placing it. The casting quality was good, and I didn't have to do too much clean up on them.

I went with a mix of the 70's (figures 3 and 4) and 80's (Figures 1,2, and 5) costumes to add a bit of variety.  Looking at photographic references, the 70's versions seemed to be a bit darker and greener than their 80's counterparts:

1970's Silurian. Source: Doctor Who Concordance

1980's Silurian. Source: Doctor Who Concordance

I wanted them to blend together a bit better, so I used something close the the 80's color scheme, but used a bit of khaki to give it a greener tint.  To accentuate the scaly skin, I used a subtle pointillist style with the highlight color, similar to my Pterosaur (sadly it doesn't show well in the photo).   For the third eye, I went with red to mimic the attack color.

EDIT:  I tried to get some better pictures with our video camera.  The pictures are a little grainy compared to the other camera, but can can get a bit closer without it going out of focus:


 I will use the 70's figures for command and the armored 80's versions as the attack troops. In addition to the aforementioned Pterosaur, my Silurians will eventually be joined by a group of Sea Devils as well.


Tuesday, August 13, 2013

Kelso Quaker Meeting House and Old Priory

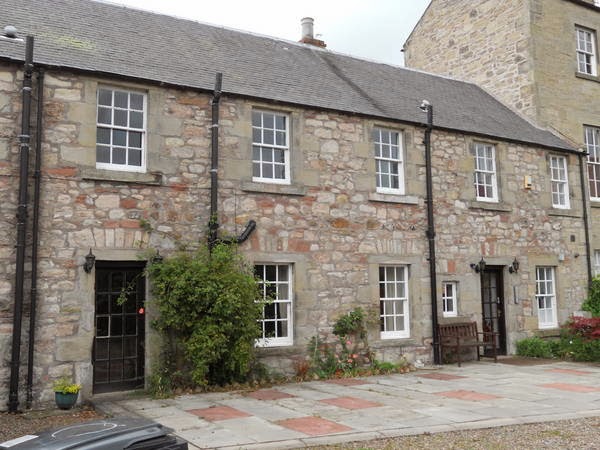
As I've mentioned before,I plan to set my VCBW battles around the town of Kelso in the Scottish Borders region.  For most of the buildings, I'll be using  generic kits from scalescenes.com. However, there are a few real structures I'd like to represent in order to give it a more authentic feel. Two of those are the Quaker Meeting House and the Old Priory (now a bed and breakfast).
View from Abby Row (Source:Google Maps)
Now my table and closet space will not allow me to build an accurate copy of these buildings, so I decided compressed versions were in order.  Rather than build everything from scratch, I decided to start with the Scalescenes' farmhouse kit and add on to that as needed. 

First up is the meeting house, which was once the coach house for the priory.
Source: Scotland's Churches Trust
For this, I needed to do some scratch building. The street end could easily be built to size using the side of the small terraced houses kit with added windows and a door.  For the garden side, the building was just going to be too long, and I decided to severely truncate it. As such, I used a terraced house front and modified the windows on the second floor so there would be more. For the textures, I used squared rubble sheets, extra roofing from the farmhouse kit, and ground tiling from the outbuildings and walls kit.
Street end of the meeting house.  The lower window I had is too small compared to the real building, but I still think it looks ok.
The very short garden side of the meeting house.
Next up is the main building  of the old prioryThis is an L-shaped building, two to three stories in height depending on the section.  There is a large garden on the Abby Row side and the main entrance is is on Wood Market.
Source: Tripadvisor.com

 Three stories would look odd for my compressed building, so I decided to give my model two. This is where the farmhouse model came into play.  Sadly, the building is not nearly as tall as the two story terraced house kit, so it came out looking shorter than I hoped.
Old Priory garden
 Another issue with this kit is one of door size.  I am working at 1/63 scale, which is already a bit small for 28mm figures. As this kit represents an older building, the doors are undersized compared to more modern standards, making it look like my figures would be beheaded going through the doors. To try and hide this,I built a foundation for the building that is about 3mm thick.
Figures next to the raised door; not too bad looking now.
 For the Wood Market side, the house doesn't have a main entrance, just a small pantry door.  As such, it doesn't look anything like the reality of the building.
Wood Market road side.
 The farmhouse kit comes with a large barn as well, so I thought that might be a good stand in for the the workshop seen in the first photo.  Other than the size, the barn isn't a close match to the real building and I considered heavily modifying it. Also, it is completely separate from the priory complex rather than being part of it.  I want to be able to use this building complex as a stand alone farm also, so ruled against drastic changes.  However, as a nod to reality, I added a rolling door on to the end of the barn.
The building is open to the garden, unlike reality. As you can see, there is interior detailing.
Added rolling door
 To complete the look of the garden, I used walls and an outbuilding taken from the same kit where I got the ground tile, along with some concrete and squared rubble texture sheets. The ground area will then filled in with turf and assorted HO and O scale plants from the train shop.


 Now I have to admit I didn't know anything about Quakers prior to working on this project, but I found out a few interesting things.  They tend to be pacifists, and operated the Friends Ambulance Unit (FAU)  during both of the world wars.
Member of the Friends Ambulance Unit.  Source: Wikipedia
I've decided to roll this knowledge into my Kelso scenario.  Troops within a certain distance of the meeting house will potentially be delayed or even put down their arms as they listen to the pleas of the Quakers to stop the violence.   Doc will also run a first aid center out of the complex, providing help to both sides.  Perhaps for Christmas, I'll get some more Quaker medical teams added who can roam the board. 


 So the final product doesn't look exactly like reality (my apologies to anyone from Kelso) , but overall I think it will give the feel that I'm looking for.
Reality
Fantasy

Sunday, July 28, 2013

OMEGA DOOM: A Superhero AAR

My oldest was unable to play in the Pokemon tournament at the hobby shop today, so I decided to make it up to him by bringing out the superheroes for a bit of action instead.


Doctor Doom and his HYDRA allies had managed to intercept a secret S.H.I.E.L.D. shipment of Omega Energy crystals, (not so) cleverly disguised as a Weetabix truck.  Who could stop him from seizing this awesome source of  destructive power?

Luckily, the Fantastic Four were in the area.
Masato readies the Thing and Human Torch
Kiyoto gets Mr. Fantastic and Invisible Woman prepared
 Doctor Doom knew he was in trouble and braced himself for the attack.

As Mr. Fantastic and the Invisible Woman raced down the street, the Human Torch took to the air and the Thing charged Doctor Doom.  However, Doctor Doom got the best of the Thing this turn and managed to injure him with his electric shock gauntlets.

 The Human Torch fired off a nova heat blast at a HYDRA trooper, but unfortunately missed.  The initial combat was going in the villains' favor.

 Mr. Fantastic and Invisible Woman make it to the fray, taking on a HYDRA trooper who gets knocked out.
 
 This time Human Torch hits his target, taking out another trooper. The Thing manages to score a few licks on Doctor Doom behind the truck, but a HYDRA trooper manages to score a hit on Mr. Fantastic with an RPG.  Luckily his rubbery body absorbs some of the damage.

 The Human Torch scores against another HYDRA trooper who tried to take cover behind the truck. Mr. Fantastic takes out the trooper with the RPG, while Thing and Doctor Doom continue to slug it out.

 Doctor Doom is finally knocked out by the Thing, leaving Mr. Fantastic and Invisible Woman to mop up the last of the HYDRA troopers.

The Fantastic Four returned the Omega Energy crystals to S.H.I.E.L.D., keeping Superhero City safe once again from Doctor Doom's nefarious plans.

Wednesday, July 10, 2013

VSF Game with Sactanks Group

Over the holiday weekend I went up to Sacramento to visit family and was invited by Skrapwelder to join the Sactanks group for a VSF game using the Martian Empires rules.

Rather than a Martian invasion, this battle was set in the Harry Turtledove "Southern Victory" world. Colonel Teddy Roosevelt and his troops were tasked with holding the Montana border against a British invasion from Canada.

The setup at the start of the game.  The American defensive line is on the left, and the British and Canadian forces  gather on the right to start their push.
I was tasked with holding the center against two light tanks and British postal troops. The Gatling guns proved ineffective against the tanks, and the infantry had partaken of a bit too much whiskey to hit anything.Some British lancers  came down the road and engaged one of my units in hand-to-hand combat

British and Canadian dead litter our left flank, but of their steam coaches managed to get across the line.

My unit finally managed to come out of its drunken stupor (either that or they got the lancers drunk), and managed to hold out for  five rounds of combat, delaying the British advance.
However, they eventually broke, leaving a gap in the line that the British began exploiting.
On our right flank, an American areonef arrived, drawing the attention of the British tanks and lessening the pressure on our infantry.  This is a beautiful scratch built model by Skrapwelder.
I had managed to drive back the postal troops, but they were rallied by an officer and came back with a vengeance.  Eventually I was down to just the Gatling guns, which were overrun in the flank.
Our areonef managed to disable the British heavy tank, but eventually was unable to steer after being hit by both light tanks.
At the end of the night six British units had made it across, but we inflicted enough casualties for it to still be an American victory.

Overall it was a lot of fun, and it was great to meet Skrapwelder, LeadfoolAlfrik, and some of their other club members.  Hopefully I can work it into my schedule to visit again.