Showing posts with label Terrain. Show all posts

Thursday, May 15, 2025

Baltic Independence Wars: Final Units and Buildings

Construction for my Baltic Independence Wars project has come to a close with the last few units and bits of terrain.

First up are a unit of Astrakhan Cossacks painted as part of Bułak-Bałachowicz's Mounted Partisan Detachment. These were painted using the plate in Osprey's " Armies of the Baltic Independence Wars 1918-20" as reference.  I really like these Copplestone miniatures, but wish more than two horse poses were available.  They are a little larger than my Great War Miniatures German cavalry, but I don't think it looks too egregious on the table.

Copplestone 28mm White Russian Astrakhan Cossak Cavalry Miniatures for the Baltic Independence Wars

Next are an Estonian machinegun team and a Latvian medic.  The machinegun team is by Empress and actually comes with four figures. However, all my other machinegun teams for this era have three figures, so I elected to move the fourth figure to my artillery team. The stand for the machinegun was a little challenging to assemble, but I think I was able to hide the worst of my sins in the basing. The medic was assembled from the Wargames Atlantic plastic Great War Russian kit, with the addition of an armband I made from some thin plastic.

Empress 28mm Estonian Machine Gun Team and  Wargames Atlantic Latvian Medic for the Baltic Independence Wars. Built using Russian miniatures.

Estonian artillery team with spotter. This M1910 Howitzer is by Empress and I've added the standing officer from their machinegun team.   Looking at photos of surviving examples, they have been painted in a variety of greens; not knowing what was period correct, I've gone with just a general drab green.  The observer is another Wargames Atlantic figure.  There are no binoculars in the Russian set, so I used a pair from the WA Germans and created a neck strap from the German gasmask strap.

Empress 28mm Estonian M1910 Howitzer Team and  Wargames Atlantic Artillery Spotter for the Baltic Independence Wars. Built using Russian miniatures

The final unit is a resin Russian pattern Austin Armored Car from Empress. According to this Russian site, the Latvians received a captured Red Army Austin in 1919 that was renamed "Zemgaleetis."  It went through a few different paint schemes during its service, but I'm hoping I have the correct one for the war. For the logo, I made some decals at home; They aren't the best quality, but still look better than what I could accomplish by hand. The resin casting was pretty good, but the kit arrived with the rear fenders broken. I had to rebuild them from the remaining fragments, some plasticard, and some brass rod for the rivets. The other major challenge with the kit is there are no registration marks for the front fenders and wheels, and the two turrets. I ended up gluing some of the parts into positions that I thought were correct, but didn't fit with the other parts; So had to break them off the kit and rebuild. This resulted in some damage to the car (one of my my turrets is now a little lopsided and I had to remake some of the rivets), but I'm hoping its not too noticeable. 

Empress 28mm Latvian Russian-Pattern Austin Armored Car "Zemgaleetis" for the Baltic Independence Wars.

I also finished up a few more village buildings for the battlefield.  These are MDF kits from Things from the Basement's Russian Village line. Overall, I really like these kits. The MDF for the the main structural elements is thicker than the equivalent Sarissa Precision kits, though I did manage to break a few of the the thinner decorative elements during the building process. My one complaint would be the sizes of the doors on the kits; They come in around 30mm high, so look short with 28mm figures.

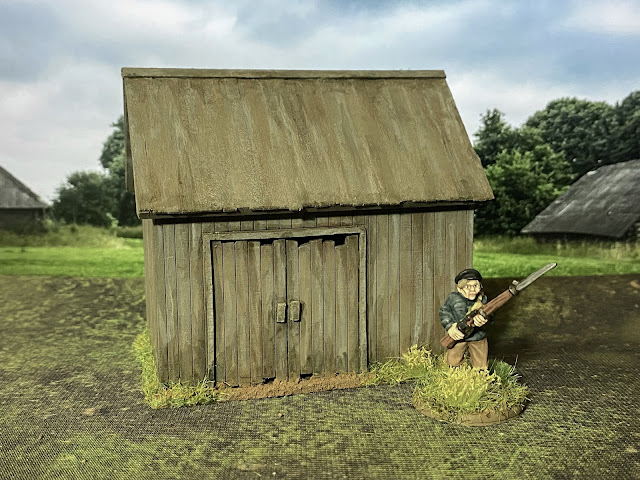
The izba log cabins come in a set of two and are very easy to assemble (you can download instructions from the company site).  The only modifications I made to the kits were to add some additional wood strips to the roof peaks in order to hide the gaps.

Things from the Basement 28mm MDF Russian-style Izba Log Cabin for the Baltic Independence Wars

Things from the Basement 28mm MDF Russian-style Izba Log Cabin for the Baltic Independence Wars

A dacha cottage house. I added some card strips to the roofline to hide the gaps. No base is included with this kit, so you're limited in how much additional basing detail you can add.

Things from the Basement 28mm MDF Russian-style Dacha House for the Baltic Independence Wars

And with that, I just need to talk someone into a game so I can get everything on the table.


Sunday, February 23, 2025

Baltic Independence Wars: Estonian and Latvian Infantry plus Buildings

There are no dedicated lines of miniatures for Estonian and Latvian troops in the Baltic Independence Wars, so you must use proxies and conversions to represent these soldiers. Looking through the Osprey book, there were a lot of uniform/equipment options depending on the army and timeframe for the war: Russian, German, American, and British kit seemed commonplace. Photos of reenactors from the 100th anniversary of the Battle of Cesis showed them mostly using Russian uniforms with a bit of German equipment mixed in. Based on this, I decided to use Russian figures for my proxies.

My Estonian command was built from Copplestone Casting miniatures.  Two of the figures looked close enough to represent the Estonian M1919 uniform, and I decided to go with the blue dress version rather than the standard grey purely for the aesthetics.  The third figure had a distinctively Russian tunic, but I opted to still give him the dress pants and cap to better match the other officers.    

28mm Estonian officers for the Baltic Wars of Independence 1918-1920. Miniatures converted from Copplestone Castings Russians

Creating the Latvian command was a little tricky, as they wore the Balodis cap and a French style tunic as part of their M1919 uniform.  I had one Copplestone figure in a greatcoat hiding his uniform that also had his hatband visible all the way around, so I trimmed his cap back and got a passing approximate. The second figure was created from a Wargames Atlantic Russian officer body. I shaved down the epaulets and tried to make his collar look as French as possible. None of the WA heads were appropriate for conversion, but I found a Warlord WW2 British officer's head in the bits box that I was able to modify into something reasonable. 

28mm Latvian officers for the Baltic Wars of Independence 1918-1920. Miniatures converted from Copplestone Castings and Wargames Atlantic Russians

The first unit of Estonian infantry was created from the Wargames Atlantic Russian plastic set, with a couple of Empress RCW figures thrown in. When ordering the Empress figures, I didn't notice that this pack had brimless caps, but I don't think the difference will be too obvious on the table. While the WA Germans suffered from bodybuilder proportions in their arms/torsos, WA seemed to have listened to customers' feedback; the Russian are much more naturally proportioned. As such, the thinner Empress figures didn't stand out as much this time.
28mm Estonian Infantry for the Baltic Wars of Independence 1918-1920. Miniatures converted from Wargames Atlantic and Empress Russians

As with my Germans, I wanted each unit to be slightly different in appearance to help with tracking units on the table.  There again seemed to be a lot of variation in the Russian tunic colors during the conflict, so I embraced that here. I also decided I would use helmets on the veteran units to make their status more obvious. There seemed to be a fair amount of German helmets floating around the Estonian army, so I used leftover heads from my WA Germans, along with some grenades. 

28mm Estonian Infantry for the Baltic Wars of Independence 1918-1920. Miniatures converted from Wargames Atlantic Russians and Germans

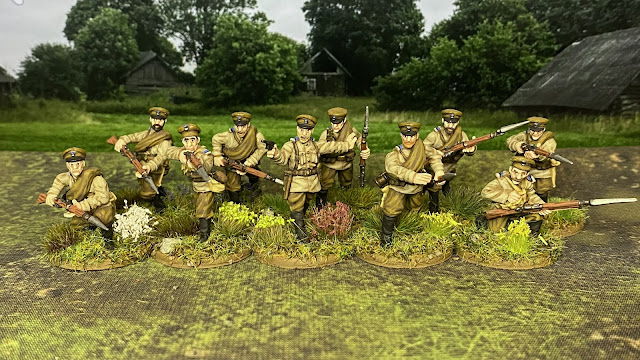
Latvian Infantry. As with the Estonians, these were made from Wargames Atlantic figures with a couple of Empress miniatures thrown in.

28mm Latvian Infantry for the Baltic Wars of Independence 1918-1920. Miniatures converted from Wargames Atlantic and Empress Russians

Latvian veterans. Based on the Osprey book, M1915 Adrian helmets were very commonly used by this army. The unit was a pretty even mix of WA and Empress figures; the Empress helmets were a bit thinner, but I didn't think it was immediately obvious on the table. 

28mm Latvian Infantry for the Baltic Wars of Independence 1918-1920. Miniatures converted from Wargames Atlantic and Empress Russians

The last unit represented poorly equipped new recruits and was built from Copplstone Casting's partisans. The mix of figures in the pack was random, but I unfortunately got a poor mix; there were 3 pairs of duplicates and 4 of the figures were built off the same body dolly. I did my best to hide the repetition with the paint schemes, but still wished it had a bit more variation. 

28mm Baltic partisans for the Baltic Wars of Independence 1918-1920. Miniatures converted from Copplestone Castings Russians

And here you can better see how the figures from the various manufactures sized up. The Wargames Atlantic Russians are thinner in proportions than their Germans (including the heads), and now sit somewhere between Empress and Copplstone. It was also interesting to see a bit of size creep in the Copplestone figures; the Russian officers were a little taller and bulkier than the partisans from the same line. 

Size comparison of 28mm World War One/ Russian Civil War miniatures: Copplestone Castings, Wargames Atlantic, Empress Miniatures
Copplestone, Wargames Atlantic, Wargames Atlantic, Empress, Copplestone

I also decided to take a break from painting figures and assembled the first of my new buildings. First up were a couple of Sarissa buildings, with modifications made to their roofing materials. While nice looking, they are actually quite small and at most you'd be able to fit around 2-3 miniatures inside. 

Sarrisa Precision 28mm Eastern European building for the Baltic Was of Independence and Russian Civil War

Sarrisa Precision 28mm Eastern European building for the Baltic Was of Independence and Russian Civil War

I also decided to try out the offerings from Things from the Basement. This house was much larger in size and could hold quite a few figures.

Things from the Basement 28mm Eastern European building for the Baltic Was of Independence and Russian Civil War

I still have a few more units to paint and some additional buildings to assemble, but the finish line is in sight and I can't wait for an opportunity to finally get a game in.

Sunday, October 6, 2024

Into the Wasteland: Caesar’s Legion and Scatter Terrain

So far I have been using 3D printed proxy miniatures for my Fallout project, but I took the plunge and bought the offical figures for Caesar's Legion from Fallout New Vegas. While the Vermillion Miniatures proxy Spartans are nice, I wanted something with more firepower that looked game accurate. The listed price for the box of eight miniatures on the Modiphius site is US $60.21 ($7.53 per figure), which isn't justified, but I was able to find a box for a little over half that price elsewhere.

Modiphius Fallout: Wasteland Warfare Caesar's Legion 32mm miniatures

The figures were produced in a flexible resin and needed to be assembled.  The casting quality was average, with some flash buildup and a few of the bases having chunks missing off the edges. The sculpting was fairly decent, but nothing better than the unofficial 3D prints on the market. For painting, I used Fallout New Vegas screen captures for reference, but opted to brighten the reds to give them more pop on the table.

So here are the figures in detail:

Legion Recruits 

Modiphius Fallout: Wasteland Warfare Caesar's Legion 32mm Recruit miniatures

Prime Legionaries

Modiphius Fallout: Wasteland Warfare Caesar's Legion 32mm Legion Prime miniatures

Legion Explorer and another Prime Legionary

Modiphius Fallout: Wasteland Warfare Caesar's Legion 32mm Explorer and Legion Prime miniatures

A Centurion with salvaged power armor elements and a thermic lance, along with a Decanus commander.

Modiphius Fallout: Wasteland Warfare Caesar's Legion 32mm Centurion and Decanus miniatures

In addition to the troops, I also painted up some more scatter terrain. Many of the elements were 3D prints from Etsy (they often came as part of the figure sets from Vermillion Miniatures), but I also picked up some nice resin pieces from TT Combat.

Phoenix Fizz vending machines from TT Combat. You can build them with the doors open or closed, and the back panel can be left on or off.

28/32mm Apocalyptic Wasteland Scatter Terrain: TT Combat and Vermillion Miniatures

Bits of furniture.  The dressers could be assembled with different drawer layouts for variety.  

28/32mm Apocalyptic Wasteland Scatter Terrain: TT Combat and Vermillion Miniatures

A raider throne from Vermillion, along with a mix of junk from both companies.

28/32mm Apocalyptic Wasteland Scatter Terrain: TT Combat and Vermillion Miniatures

Small rock formations from Vermillion, along with a Deathclaw nest.

28/32mm Apocalyptic Wasteland Scatter Terrain: TT Combat and Vermillion Miniatures

3D printed piles of street debris (both pieces are the same, just rotated). The 3D print lines were fairly prominent, but I opted not to spend the time needed to fully sand everything down. I think they will still look good on the table.

28/32mm Apocalyptic Wasteland Scatter Terrain: TT Combat and Vermillion Miniatures


Sunday, August 25, 2024

Into the Wasteland: Super Mutants, Behemoth and Billboards

I've added some more dangers for my survivors to encounter as they wander the wasteland. These Fallout-style super mutants are designed by Vermillion Miniatures and were purchased off of Etsy from a couple of vendors.  The bulk of them are from the "Atomic Mutants" set, but I've also included a few figures from "The Atomic Unity" and "Cafe of Broken Dreams" sets.

Vermillion Miniatures Fallout Wasteland Warfare super mutant and behemoth proxy miniatures

First up is a proxy for the named super mutant Marcus, from Fallout 2 and New Vegas. For his paint scheme, I've done my best to mimic what was seen in the video games. 

Vermillion Miniatures Fallout Wasteland Warfare super mutant Marcus  proxy miniatures

Various super mutants. All of them came with various weapon options, so you can do a bit of customization. They run about 40-45mm to eye level, depending on the pose.

Vermillion Miniatures Fallout Wasteland Warfare super mutant  proxy miniatures

Vermillion Miniatures Fallout Wasteland Warfare super mutant  proxy miniatures

Vermillion Miniatures Fallout Wasteland Warfare super mutant  proxy miniatures

A super mutant behemoth.  This guy is a brute, standing about 70mm to the eye. 

Vermillion Miniatures Fallout Wasteland Warfare  behemoth proxy miniature

I just love the detail of the dead vault dweller on the supplied base.

Vermillion Miniatures Fallout Wasteland Warfare  behemoth proxy miniature

I've also added a few billboards from TT Combat. While they were easy to assemble and look good for MDF, the one issue I have with this is they are very top heavy and the position of the sign means they can tip over backwards quite easily.  I may add bases or weights in the future to help with this. 

For the signs themselves, I selected images from Fallout New Vegas. While they print out already distressed, I added more grime and streaks using Army Painter Quickshade.

TT Combat Billboard with adverting for Fallout Wasteland Warfare's Repconn HQ Museum from Fallout New Vegas

While I know Nuka Cola is the iconic beverage of the Fallout franchise, I decided to buck convention and go with its competitor, Sunset Sarsaparilla.  I figured this lesser known brand would also be easier to use in non-Fallout settings.

TT Combat Billboard with adverting for Fallout Wasteland Warfare's Sunset Sarsaparilla from Fallout New Vegas

 Out of the Fallout proxy figures I've painted so far, I have to say the mutants were my favorites.  The sculpting quality was top notch, and I particularly loved the detail in the faces. Vermillion Miniatures has just released another super mutant set with some great looking figures (including another behemoth), so I may be adding more in the future. 

Saturday, December 3, 2022

Sahel Conflicts: Terrainify Outcroppings for Tigharghar Mountains

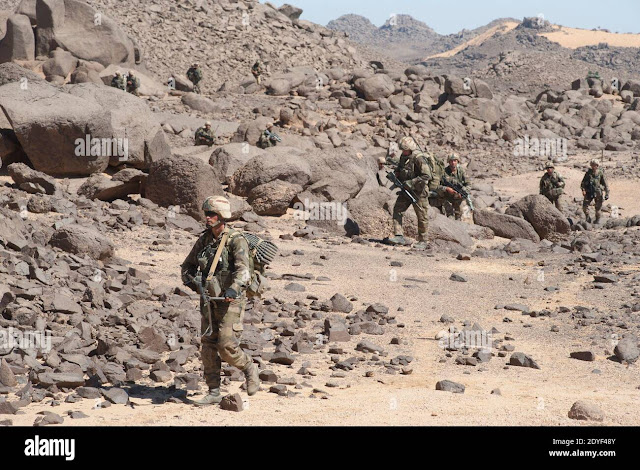
While I had a fair amount of urban/village terrain for my Mali wargaming, I wanted to have more options for battles out in the countryside. In 2013, French and Chadian forces fought against the Islamist insurgents in the Tigharghar (Tegharaghar) Mountains of northern Mali during the Battle of Ifoghas, and I wanted to look for terrain that would be appropriate. The major terrain feature for this area appeared to be large piles of black basalt rock. 

Tigharghar (Tegharghar) Mountains, Mali. Source: https://www.bbc.com/news/world-africa-21326831
Source: BBC

Tigharghar (Tegharghar) Mountains, Mali. Source: https://www.alamyimages.fr/photos-images/adrar-des-ifoghas.html?sortBy=relevant
Source: Alamy

I considered making terrain for this out of high density foam, but was concerned that the tall rock spires needed wouldn't hold up well during transport between home and the gaming store.  Looking around for 3D prints, I found the eBay store for Terrainify and thought their Craggy Hills Outcroppings would  meet my needs.  I was a bit concerned with the resolution of the prints after looking at their photos, but I thought I'd give them a try and bought the unpainted large prints.

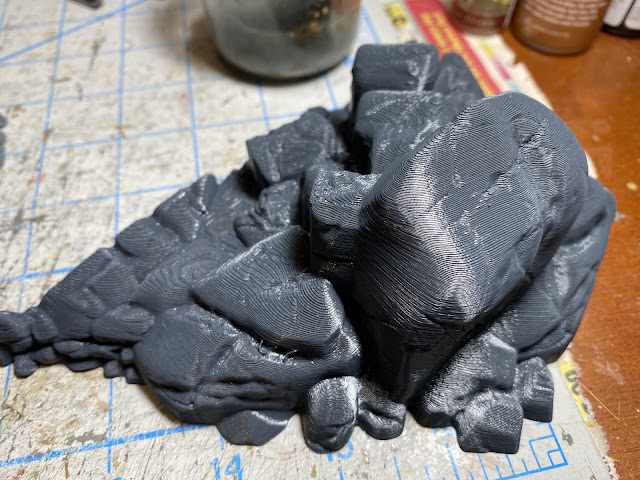
While the sculpt quality and style was just what I wanted, my concerns around the print resolution were justified, as you can see below.

Terrainify Craggy Hills: Printing is low resolution printing

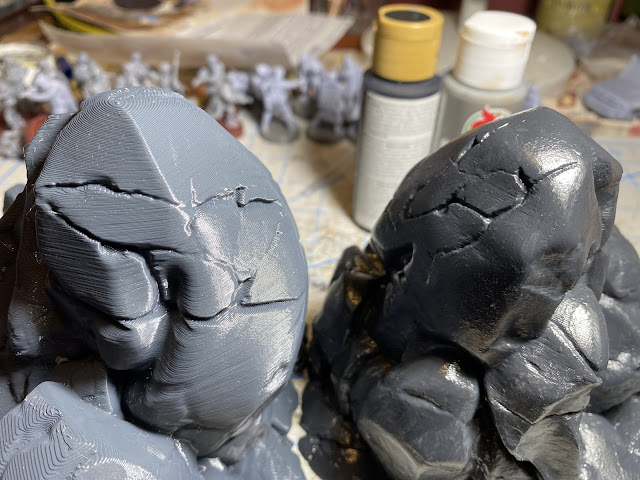
If left as is, the prints would not have looked like the rocks in the area, and drybrushing would have been a real problem. As such, I decided to hand sand all the pieces. The plastic these were printed in was surprisingly hard (good for durability), so sanding took 30 minutes to 2 hours per piece, depending on size. But with all the nooks and crannies in the formations, it was impossible to remove all the print layers. I used some Squadron white putty to further conceal them, and in the end I was able to get them looking decent, though not completely free of lines. 


Terrainify: Original texture on the left, sanded and filled on the right
Left: Original texture Right: Sanded and filled

It took a lot more work than I expected (and I had some pretty sore hands after the sanding), but I was able to get them to a place that satisfied me. With the large scale prints, I had enough rocks to cover about a quarter or so of a 4'x6' table at a reasonable density for play.

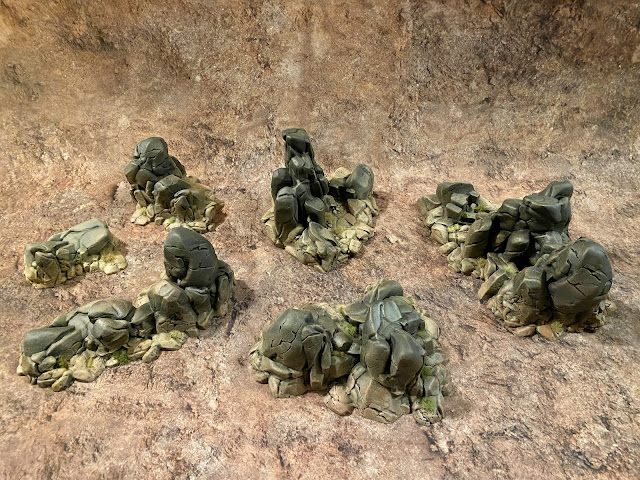
Terrainify Craggy Hills Outcropping Bundle

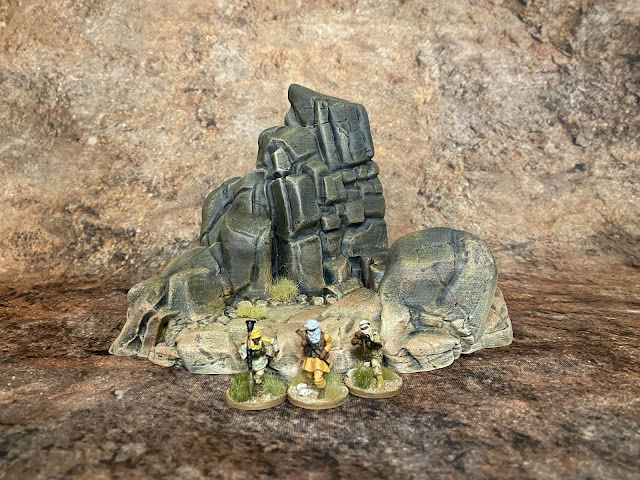
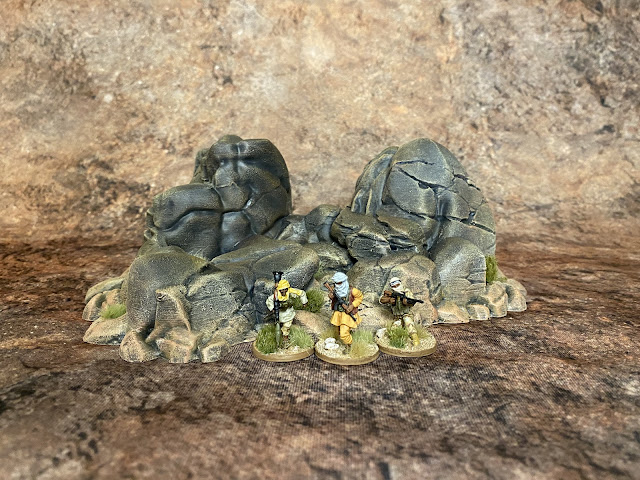
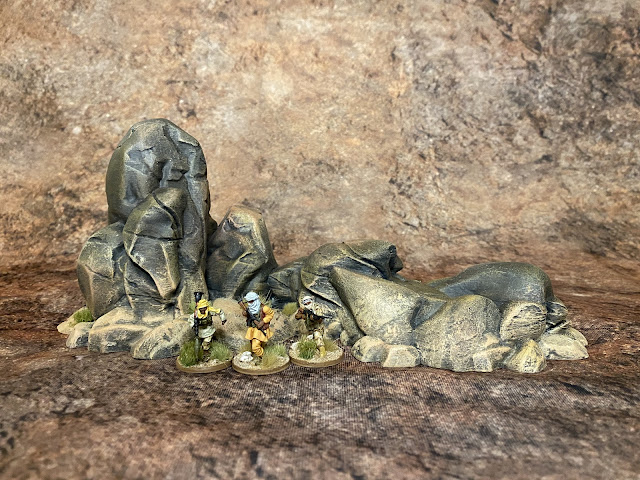
To give a better idea of how big the formations are with a large size print order, here they are with some 28mm miniatures.

Outcropping A

Terrainify Craggy Outcropping A

Outcropping B

Terrainify Craggy Outcropping B

Outcropping C

Terrainify Craggy Outcropping C

Outcroppings D and E

Terrainify Craggy Outcropping D and E

Outcropping F

Terrainify Craggy Outcropping F

So I'm a bit torn with the product. I think the final rock formations will look great on the table and give the environmental feel I was trying to accomplish. However, for what I had to pay for these (approximately $190 USD with taxes), I think the amount of physical labor they required to look good was a bit unreasonable. 

Tuesday, February 15, 2022

Sahel Conflicts: Last Shops and Final Grand Marché District

The Grand Marché (Big Market) for my tabletop is now complete with the addition of the last two buildings: a restaurant and an apartment building with shops on the lower level. 

28mm Modern African Terrain. Grand Marché (Big Market) District Shops for Mali Wargaming

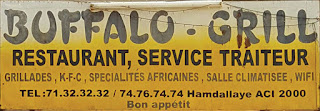
The Buffalo Grill started out as a small Roman shop from Sarissa.  This was textured and modified with various plastic elements (some scratch built, some O scale elements from San Juan Details) and a table set from 4Ground to try and give it a more modern African flavor. I left one door on the back of the building as an entrance to the residence above. One thing I would recommend with this kit is minimizing the use of the roof/awning card elements, as they are rather flimsy and won't hold up well. 
28mm Modern African Terrain. Grand Marché (Big Market) Restaurant for Mali Wargaming

The apartment building also began life as another Roman building from Sarissa. I opted to go with a flat roof to further differentiate it from the similar restaurant building, and also painted the window lattice black to help hide it.  The back doors were covered up, and a entrance built from one of the lower shops (in blue). 

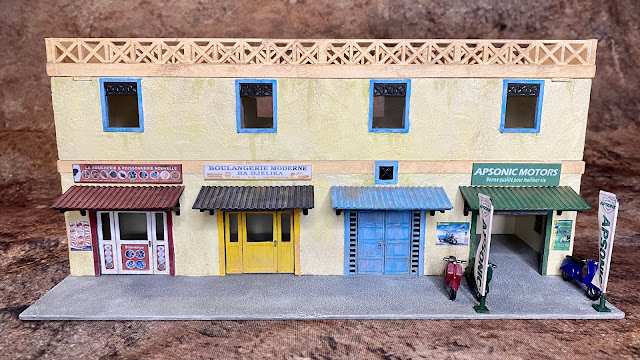
28mm Modern African Terrain. Grand Marché (Big Market) District Shops and Apartments for Mali Wargaming

In the original kit, the shop entrances are fully open, but I have scratch built roller doors (partially hidden by the awnings) and shopfronts for the butcher and baker.  As with the restaurant, these are based off of real businesses in Mali.

28mm Modern African Terrain. Grand Marché (Big Market) District Shops for Mali Wargaming

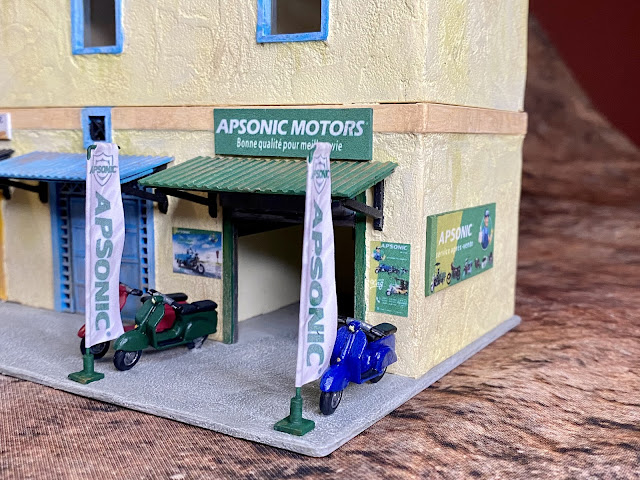
Rather than a candlestick maker, the third shop sells and services mopeds/scooters.  I didn't build this from a real prototype, but instead used advertising for a Chinese brand that seems common in western Africa.  I couldn't find modern scooters to populate the sidewalk, but Miniature Building Authority has a vintage version that I thought could get the job done.

28mm Modern African Terrain. Grand Marché (Big Market) District Shops for Mali Wargaming

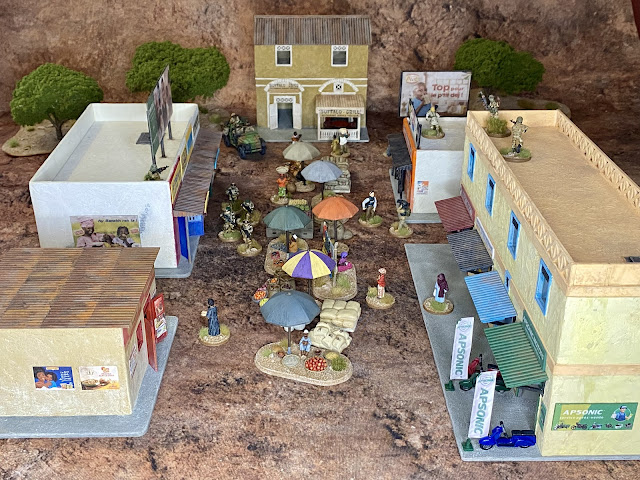
So here is my final Grand Marché, as inspired by the one in Bamako, Mali. Obviously it isn't to the same scale or chaos as the original, but it still take up approximately 0.5m x0.5m of table space and makes a great spot to ambush patrols. 

28mm Modern African Terrain. Grand Marché (Big Market) District for Mali Wargaming

Part of Bamako's Grand Marché for reference:

Grand Marché Bamako Source: https://landportal.org/pt/node/92669
Source: https://landportal.org/pt/node/92669

As with my previous shop builds, I'm including the signage (along with some others I collected) for personal use. If the owners of any of these establishments would like their signs removed, please contact me and I would be happy to do so. 

28mm Modern African Terrain. Grand Marché (Big Market) Shop Signs in French

28mm Modern African Terrain. Grand Marché (Big Market) Shop Signs in French

28mm Modern African Terrain. Grand Marché (Big Market) Shop Signs in French

28mm Modern African Terrain. Grand Marché (Big Market) Shop Signs in French

28mm Modern African Terrain. Grand Marché (Big Market) Shop Signs in French

28mm Modern African Terrain. Grand Marché (Big Market) Shop Signs in French

28mm Modern African Terrain. Grand Marché (Big Market) Shop Signs in French

28mm Modern African Terrain. Grand Marché (Big Market) Shop Signs in French

28mm Modern African Terrain. Grand Marché (Big Market) Shop Signs in French

28mm Modern African Terrain. Grand Marché (Big Market) Shop Signs in French

28mm Modern African Terrain. Grand Marché (Big Market) Shop Signs in French

28mm Modern African Terrain. Grand Marché (Big Market) Shop Signs in French

28mm Modern African Terrain. Grand Marché (Big Market) Shop Signs in French

28mm Modern African Terrain. Grand Marché (Big Market) Shop Signs in French

28mm Modern African Terrain. Grand Marché (Big Market) Shop Signs in French

28mm Modern African Terrain. Grand Marché (Big Market) Shop Signs in French

28mm Modern African Terrain. Grand Marché (Big Market) Shop Signs in French

28mm Modern African Terrain. Grand Marché (Big Market) Shop Signs in French

28mm Modern African Terrain. Grand Marché (Big Market) Shop Signs in French

28mm Modern African Terrain. Grand Marché (Big Market) Shop Signs in French

28mm Modern African Terrain. Grand Marché (Big Market) Shop Signs in French

28mm Modern African Terrain. Grand Marché (Big Market) Shop Signs in French

28mm Modern African Terrain. Grand Marché (Big Market) Shop Signs in French