Showing posts with label Aircraft. Show all posts

Sunday, August 23, 2020

Allied Air Support for China

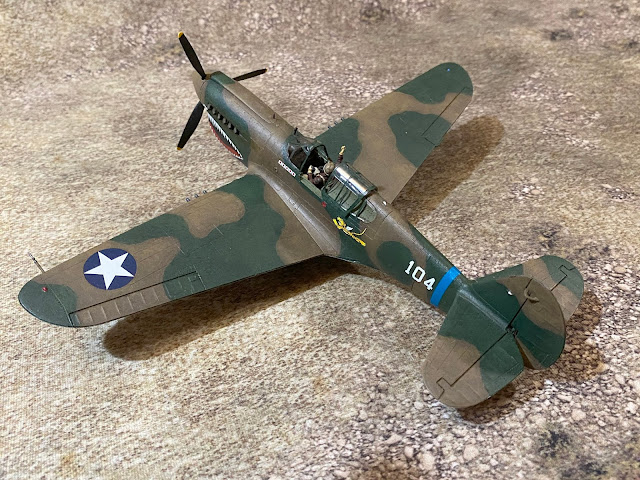
 The Bolt Action rules do not technically allow aircraft to be used by Chinese armies, but since I've expanded into the southern Chinese theater and have American allies working with them, I thought I could make the argument to include some American air support as well. While I would have loved to use a B-25 Mitchell (my great uncle flew them over China), it would be too big for 28mm wargaming.  Since they were escorted by P-40s, I thought that would make a suitable alternative.

Hasegawa 1/48 P-40E 23rd Fighter Group, China, 1942

Hasegawa 1/48 P-40E 23rd Fighter Group, China, 1942

This particular kit was a P-40E produced by Hasegawa. It came with the options for the 23rd Fighter Group based in China and the 49th Fighter Group based in Australia. The kit did not include a pilot and was only configured for the landing gear to be down.

Hasegawa 1/48 P40-E

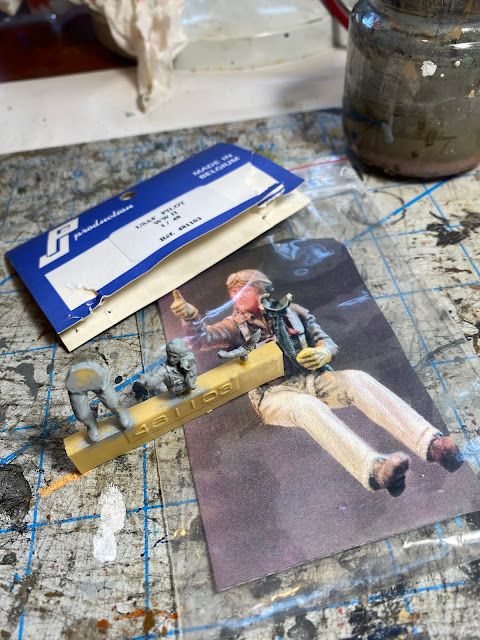
Since it would look odd to have a flying plane without a pilot, I had to locate a separate pilot kit. Unfortunately, it proved fairly difficult to find options in 1/48; I only found a single 1/48 American Army pilot, which was produced by PJ Productions out of Belgium.  My order was not large enough for them to sell it to me direct, so I was forced to use eBay to locate one.  The final price and shipping was more than I wanted to pay, but what are you going to do.

1/48 PJ Productions Belgium USAF Pilot WW2 #481103

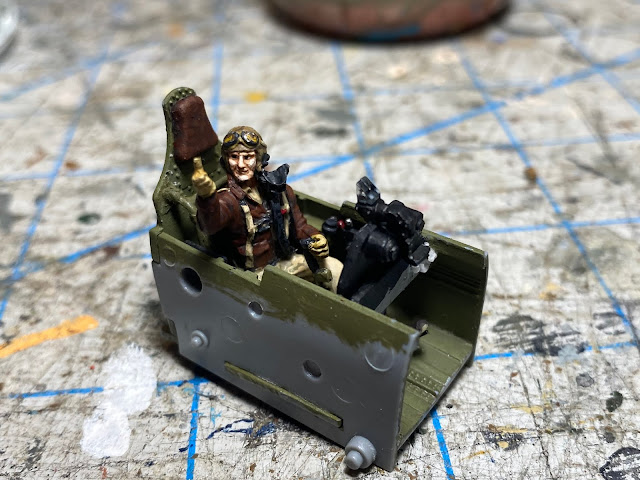
The figure was displaying a thumbs up sign, which made him challenging to fit in the cockpit, as I had to make sure his arm could clear the side of the cockpit. I ended up having to glue him up off the seat bottom to get the needed clearance, and also had to cut out part of the control panel to make space  for the legs. He was well cast, with only a couple of small bubbles on the visible areas of the figure.

1/48 PJ Productions Belgium USAF Pilot WW2 #481103

Even though the plane was in the wheels down configuration, I wanted to be able to fit it to a flight stand for gaming purposes. I normally like to drill a hole for the stand somewhere under the front of the wings, but the position of the bomb rack did not allow for this. As such, I drilled out a space behind the cockpit.

Hasegawa 1/48 P-40E Flight Stand for Bolt Action

Unfortunately, I made the mistake of not checking the inside of the fuselage when drilling my hole, and ended up going through a space that was not flat underneath. A second hole was drilled, and a section of tubing was glued in to guide the rod  through the undercarriage into the upper hole.

Hasegawa 1/48 P-40E Flight Stand for Bolt Action

The final construction ended up fairly sturdy, and not too detrimental to the visual appeal of the underside.

 Hasegawa 1/48 P-40E 23rd Fighter Group, China, 1942

Hasegawa 1/48 P-40E Flight Stand for Bolt Action

Hasegawa 1/48 P-40E Flight Stand for Bolt Action

The last part that gave me some difficulty was attaching the canopy components. The front canopy was not able to clear the cockpit's control panel, so I had to try and shave the panel down in situ without breaking anything. Luckily, I was successful and I don't think it's obvious.

Hasegawa 1/48 P-40E Cockpit Details

The top canopy had to be glued on in the open position to accommodate the pilot, which really limited the contact points with the plane. It broke off shortly after the initial attachment, but seemed to do better after attempt two.

Hasegawa 1/48 P-40E Cockpit Details

Overall, I am very happy with the Hasegawa kit and give it a thumbs up.  The molding was good, assembly fairly easy, and the price and detailing level work for wargaming.

Sunday, November 11, 2018

Remembering Our Veterans: 2nd Lt. William J. Alton


I'd like to open this post by thanking all veterans who served and sacrificed for their respective countries. 

In particular, I'd like to remember my great uncle, 2nd Lt. William J. Alton. He was a a B-25 pilot with the 22nd Bombardment Squadron (M), 341st Bombardment Group (M), flying missions in the China-Burma-India theater from mid 1942 until his death in early 1943.


He and ten other men were killed when their planes collided over Chakulia, India while participating in a formation bombing training exercise.

1st Lt. Samuel C. Dickinson
2nd Lt. Nicholas Marich
2nd Lt. William J. Alton
2nd Lt. Samuel M. White
S/Sgt. Robert L. Propst
S/Sgt. Vernon M. Harrison
Sgt. Guy V. Horn
Sgt. Jesse C. Levee
Cpl. Finley H. Ganoe
Cpl. Sidney S. Newsome
Pvt. Anthony M. Mandello 


Sunday, June 24, 2018

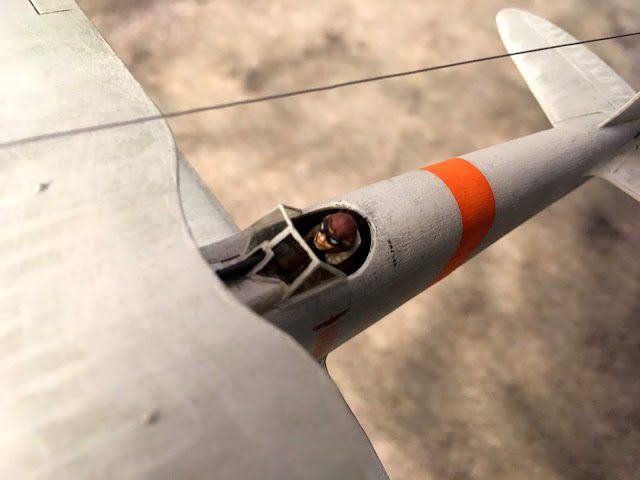
Kawasaki Ki-10-II over China


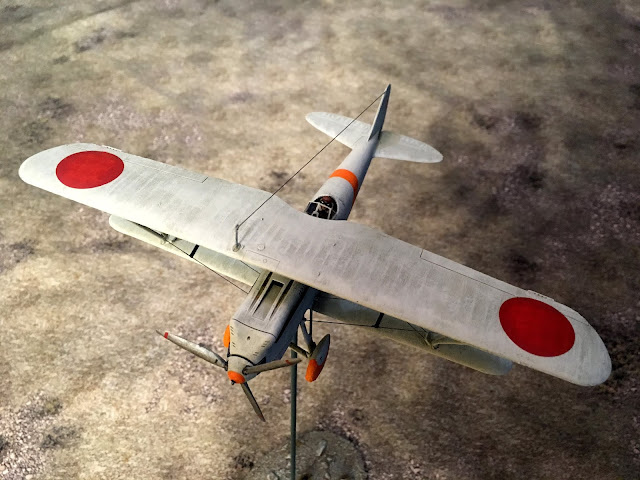
My Nationalist Curtis Hawk II has been paroling the skies of China unmolested for a while now, so I figured it was time to get a Japanese aircraft and make things a little more dangerous.  While other Japanese WWII planes tend to get all the attention, I have to admit I'm a sucker for biplanes. As such, I've chosen a Kawasaki Ki-10-II (Allied code name "Perry").

1/48 Kawasaki Ki-10-II Perry

This particular kit is a 1:48 Fine Molds model obtained from Hobby Link Japan.  Fine Molds makes three variants of this plane, and I've gone with Capt. Tateo Kato's fighter seen over China in 1938.


Overall this is a very nice kit that I was able to assemble over a weekend. There was some warping in the fuselage halves, and I had to shave one of the support beams to get it to fit into its slot, but nothing atypical for plastic biplane models. The wire support cables and spreader bars were not included with the kit, but I had plenty of items in the bits box to take care of that.

1/48 Kawasaki Ki-10-II Perry

The most difficult part of the build was applying the orange decals to the landing gear.  The kits gives you the option of two Ki-10 variants, one with covered wheels and one with open wheels.  I opted for covered and found that the decals were rather thick and the edges did not want to lay flat on the curved cover, even with a generous treatment of Micro Sol. I could tell the edges were going to crack and flake off over time, so decided to cover then with a film of superglue and run some orange paint over the seams.  The leading edge of the wheel cover looks a little bumpy as a result, but better than the alternative.  

1/48 Kawasaki Ki-10-II Perry

As with my other planes, I wanted to be able to display this on the ground or mounted to a flight stand. To accommodate this, I drilled a hole under the wings and built a sleeve of small washers to hold the brass rod.  This will keep the plane from tipping on the stand and prevent additional wear and cracking around the opening.


1/48 Kawasaki Ki-10-II Perry

The kit included three figures: a seated pilot, a standing pilot, and a ground crew member working on a machine gun.  As a nice bonus, there were also some barrels, supplies, and a table with a few bottles of sake. I haven't assembled these yet, but think they will end up as some sort of objective marker in the future.

1/48 Kawasaki Ki-10-II Perry


I'm quite happy with the final product and can't wait for it to make an appearance on the the battlefield. 

1/48 Kawasaki Ki-10-II Perry


Monday, December 21, 2015

Chinese Curtiss Hawk II


With the arms race for our Back of Beyond games continuing, I felt it was time to get some air power for my Chinese forces.  I wanted an aircraft that wouldn't look out of place in the warlord era, but could also serve double duty for early WWII.  As such, I thought a late 20's/early 30's biplane with an open canopy was my best option.  I looked online at the Nationalist's aircraft inventories, and thought a Curtiss Hawk II would fit the bill nicely. The Hawk II was the export model of the Curtiss F11C Goshawk, which was introduced into China in the early 1930's.

The next step was finding one in 1:48 scale. Unfortunately, there are currently none in production, so I had to go to the second hand market. On eBay I found kits from several manufactures, but Lindberg seemed the most common and the cheapest. Old kits can be hit or miss, but I found one for  $15US (including shipping) and thought it was worth taking a shot. Note:  The box calls it a 1/4 kit rather than 1:48.

From the musty smell, yellowing decals, and original $3 price tag, I suspect my kit was produced sometimes in the 60's or 70's.  The kit had been opened and the seller said the stand was missing, but that all the other parts were present. I found that wasn't quite the case, with the pilot and  spreader bars for the support wires also missing (support wires are not included).  However, these were easily dealt with using the bits box.


 The kit itself was actually rather good for wargaming purposes, despite its age. I had no warped parts, the flash was minimal, and everything seemed to fit rather nicely. The details aren't really on par with modern kits (for example, the cockpit just consisted of a simple chair), but there is enough to look good on the table. I can't comment on the accuracy compared to the real thing, but again, it will look good on the table.


The build was relatively straight forward, and I liked that the wings came in upper and lower halves, allowing me to hide the terminus for each wire within the wings. The only really tricky part was adding the spreader bar to the wires. However, it was more of a modelling challenge than an act of frustration.


As my kit had decals for an American navy craft, I had to track down some Chinese decals. Nobody is currently making Hawk II decals in this scale, but Bestfong produces 1:48 Gloster Gladiator decals that work.  The aircraft number will now obviously be off, but I figure the odds of someone spotting that are pretty small.


The decals are nicely printed but also a bit thicker than I'm used to seeing. As such, I really recommend using Micro Sol or something similar on them as the set in order to help them contour to model.  They are also highly glossy, so you'll need to hit them with some flat finish.  The trickiest items to work with during the application was the tail stripes; they come in two big rectangles that you have to hand cut in order to get the right shape for the rudder. That alone took me almost 20 minutes of work (including some touch up paint), but I am very happy with the outcome.


For the pilot, I used a Copplestone half figure that I had lying around. He's not my favorite out of the the pilot set ( I'm not a fan of the German pilot helmet), but he was the only one I could fit into the cockpit.


I still need to build a flight stand for my Hawk, but have test fitted it to my other one and I think it looks good in the air.


My final verdict is this is a fun, pulpy-looking aircraft that looks great in the Back of Beyond, and the Lindberg kit is a perfect fit for a wargaming model.

Saturday, November 14, 2015

British Air Support


I am currently expanding my British forces from German East Africa for use in Back of Beyond gaming as well.  The first part of said expansion is a bit of air support for my ground troops.  This particular plane is Bristol F.2B fighter, which replaced the RAF No. 31 Squadron's B.E.2Cs in 1919.


The kit I selected was an out of production Eduard's Weekend Edition I picked up on eBay for approximately $20US with the shipping. I had built some 1/72 Eduard aircraft before, and really enjoyed the kits.  With this being a "weekend" kit, I assumed it would be a quick and simple build, but I was sorely wrong.  The guiding principle the kit designer seemed to be following was why produce just one piece for a part, when five would be even better. He also believed thin parts were ideal, because who wants major support pegs having a thickness of more than 1mm.


As you can guess, building this monster was an absolute nightmare, and I came close to throwing the kit out on multiple occasions.  The supports that connect the lower wing to the fuselage were very weak and twisted as the glue dried, causing the fuselage to tilt to one side. The upper wing assembly is also crooked, as each strut had to be assembled separately using those 1mm pegs I mentioned, with more than half the pegs snapping off during assembly. 


 I went ahead and wired the wings up using some plastic line I picked up years ago in a Japanese hobby shop (it's similar to fishing line, but dark grey). You might think this was overkill, but I assure you the wings on this kit would never hold up without it.


I wanted  to use the plane both on the ground and in the air, so I drilled a hole in the bottom to accept a bit of brass rod.  The rod isn't glued in, but instead slides into a sleeve of washers glued in under the rear gunner.


The stand is made from a basswood oval (picked up at the craft store), with another washer sleeve to help support the brass rod. Pennies were added to the base for additional weight, and then everything was covered with texture gel and rock. 


The kit did not include any figures, so I ordered a pilot set from Copplestone.  They fit quite nicely in the plane and really have a lot of character. The pack also included some full pilot figures as well, which will make great objectives if a plane goes down during our battles.

  
 At the end of the day I've ended up with aircraft that is going to look decent on the table, but I'd never recommend this kit unless your are a complete hobby masochist.

Wednesday, January 16, 2013

VBCW Aircraft

Finally a new project to talk about.  I've developed an interest in starting Very British Civil War (VBCW) gaming, and some of the first items to roll off the worktable are aircraft:


These planes are 1/72 Airfix kits that run between $7-10 locally.  They are a bit under scaled for 28mm figures, but for airborne craft I think it looks better than 1/48 and also lets me get away with smaller bases.

First up is a Gloster Sea Gladiator for my British Union Fascists:


Sea Gladiator
From the box, this is an older issue kit, and it really showed.  There was a lot of flash, the panel lines didn't match up well between the two halves, and decals were minimal.  I had originally hoped to paint this in the 1937 RAF aluminum color scheme, but felt that it would really reveal the kit limitations.  As such, I went for a later (1940 if I remember correctly) Sea Gladiator camouflage scheme to hide some of those defects (though the kit didn't include arrestor hooks, so that is now a bit off).   I also scavenged some decal from other kits to make it look a bit more complete.  The roundels were originally from a WWI biplane kit (Russian, I believe) and I painted in the lighting bolts over the center.  This was a bit of a challenge, as the decals were old and started flaking during painting, but I think I have them fairly well sealed now.  The kit didn't come with any detailed rigging instructions, so I did my best from the box art using some black plastic line I picked up at an Osaka hobby shop many years ago.  Sadly I broke two drill bits during the process.

Next up is a Supermarine Spitfire Mk I:


Spitfire Mk I
From the red box, I believe this is a newer kit, and it was much better than the Gladiator.  The pieces were crisply molded, fairly well detailed, and the fit was good during assembly.  It also comes with a ton of decals, some of which are so small I'm not even sure people will even notice them.  I was worried that the plastic aerial would snap off easily (and I no longer had the small drill bit to make a hole for the line), so it was replaced with a bit of metal paperclip.  The paint scheme is from 1938, so fits in perfectly for the desired time frame.  I decided to use the standard British roundels so that I could get away with using it for either Edwardian or Georgian forces (or for WWII). 
  
Finally there is my Hawker Hurricane Mk IIc:


Hurricane Mk IIc
Another red box kit like the Spitfire, and it is also a quality product. Now this variant is a bit late for VBCW (I believe it entered service in 1941), but I couldn't find a Mk I version locally (I like to support brick and mortar shops when I can).  So I'm just going to convince myself that in this alternative history, Hurricane production development proceeded at a more rapid pace than reality.  I've assigned this craft to my Scottish forces.  The paint scheme was one used in the UK in 1941, but I've swapped out the roundels for ones used in East Asia, painting over the pale blue centers with white. I also used some Navy markings on the underside, painting the black stripes blue.


The bases were made from 1/16" brass rod and some 3" wooden disks from the local craft store that have been double stacked to 1/4" in height to help stabilize the rods.  I was a bit worried about the planes being top heavy and tipping over easily during gaming, so about a dozen pennies have been glued to the top of each base (the older ones work better, as they are heavier).  I can now get up to a 20-30 degree tilt and they'll still pop back to upright.  The bases were finished with Liquitex resin sand texture gel and some real rock, then painted in what I call "British rock quarry", a style that I came up with for my Doctor Who figures.  This is intended to allow it to blend into both rural and urban settings.

Overall I was very happy with how they came out.  Now I just need to get some ground forces painted up so they have someone to strafe.