Showing posts with label VBCW. Show all posts

Sunday, March 27, 2016

Neu-Moschi Station for the Usambara Railroad

As the final stop on the Usambara Railroad during the German colonial period, I've been wanting to add a rail station to my outpost for some time now.  I don't know what the station looked like during the period, but here is the current Moshi station:

Source: Geocaching
Nobody makes anything exactly like it, but I didn't feel like trying to build this completely from scratch.  However, Sarissa now make a European train station that I thought could fit the bill with a little work. My initial hope was to shave the roof-line and remove the chimney, but unfortunately the design of the model didn't easily allow for this. As such, I ended up having to use the stock station with some additions to the roof materials.


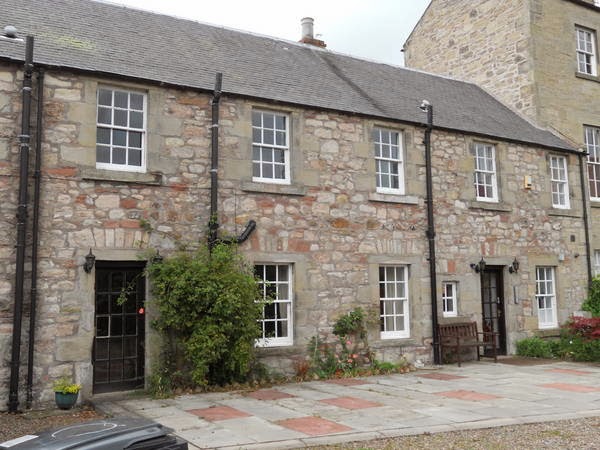
It's not perfect, but better than nothing.  I've also purchased the goods shed, which will eventually be added to the right of the station, mimicking the shed seen in the actual photo. I have no idea what the period paint schemes were for the stations, so I've decided to copy the current colors. 

The roofs are removable, along with the upper floors, so you can place figures inside. I've also opted to add a little decoration to some of the rooms.


The kit itself is relatively straightforward to build (though be sure to dry fit pieces, as I had to do some sanding to get some parts to fit) and sturdy in the end. However, there are a few design elements I don't care for. None of the corners are designed to fit flush. I think this was done to hold the roofs in place, but visually it looks a bit odd. They also don't have the roofs overhang the walls (most likely for the previous reason).  Having built up my roofs, it's not so bad, but looks worse if you use the original roofs. Lastly, the doors are all greyboard and I'm concerned they won't hold up in the long run. 

That being said, overall I'm happy with the station and think it's a good addition to the table. Though mine will primarily be located in German East Africa, I think it could very easily be brought back to Europe for either world war, or for VBCW games.

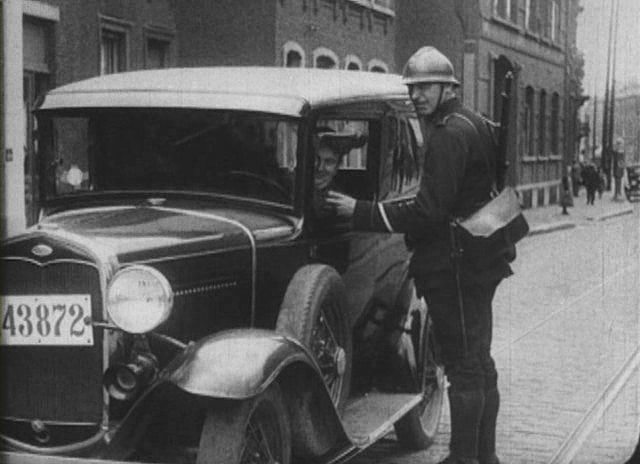
EDIT: Michi on LAF was able to dig up a period photo:

Monday, February 17, 2014

King's African Rifles

Well I'm back with another unit for my Deutsch-Ostafrika WWI project (as well as VBCW).  These are members of the King's African Rifles (KAR).


 I have painted this unit to represent the 2nd Battalion from Nyasaland as pictured in Plate F in Peter Abbott's, "Armies in East Africa 1914-18".  The uniforms are described as khaki, but the illustration shows something a bit lighter in color, which I copied here.   Also of interest is the illustration shows a diamond shaped cap badge,  while the text on page 45 states they should have a rectangular badge and 1st Battalion should have the diamond. I've again stuck with what is shown in the illustration.

Figures were obtained from Brigade Games.  They are both well sculpted and cast. 

Tuesday, August 13, 2013

Kelso Quaker Meeting House and Old Priory

As I've mentioned before,I plan to set my VCBW battles around the town of Kelso in the Scottish Borders region.  For most of the buildings, I'll be using  generic kits from scalescenes.com. However, there are a few real structures I'd like to represent in order to give it a more authentic feel. Two of those are the Quaker Meeting House and the Old Priory (now a bed and breakfast).
View from Abby Row (Source:Google Maps)
Now my table and closet space will not allow me to build an accurate copy of these buildings, so I decided compressed versions were in order.  Rather than build everything from scratch, I decided to start with the Scalescenes' farmhouse kit and add on to that as needed. 

First up is the meeting house, which was once the coach house for the priory.
Source: Scotland's Churches Trust
For this, I needed to do some scratch building. The street end could easily be built to size using the side of the small terraced houses kit with added windows and a door.  For the garden side, the building was just going to be too long, and I decided to severely truncate it. As such, I used a terraced house front and modified the windows on the second floor so there would be more. For the textures, I used squared rubble sheets, extra roofing from the farmhouse kit, and ground tiling from the outbuildings and walls kit.
Street end of the meeting house.  The lower window I had is too small compared to the real building, but I still think it looks ok.
The very short garden side of the meeting house.
Next up is the main building  of the old prioryThis is an L-shaped building, two to three stories in height depending on the section.  There is a large garden on the Abby Row side and the main entrance is is on Wood Market.
Source: Tripadvisor.com

 Three stories would look odd for my compressed building, so I decided to give my model two. This is where the farmhouse model came into play.  Sadly, the building is not nearly as tall as the two story terraced house kit, so it came out looking shorter than I hoped.
Old Priory garden
 Another issue with this kit is one of door size.  I am working at 1/63 scale, which is already a bit small for 28mm figures. As this kit represents an older building, the doors are undersized compared to more modern standards, making it look like my figures would be beheaded going through the doors. To try and hide this,I built a foundation for the building that is about 3mm thick.
Figures next to the raised door; not too bad looking now.
 For the Wood Market side, the house doesn't have a main entrance, just a small pantry door.  As such, it doesn't look anything like the reality of the building.
Wood Market road side.
 The farmhouse kit comes with a large barn as well, so I thought that might be a good stand in for the the workshop seen in the first photo.  Other than the size, the barn isn't a close match to the real building and I considered heavily modifying it. Also, it is completely separate from the priory complex rather than being part of it.  I want to be able to use this building complex as a stand alone farm also, so ruled against drastic changes.  However, as a nod to reality, I added a rolling door on to the end of the barn.
The building is open to the garden, unlike reality. As you can see, there is interior detailing.
Added rolling door
 To complete the look of the garden, I used walls and an outbuilding taken from the same kit where I got the ground tile, along with some concrete and squared rubble texture sheets. The ground area will then filled in with turf and assorted HO and O scale plants from the train shop.


 Now I have to admit I didn't know anything about Quakers prior to working on this project, but I found out a few interesting things.  They tend to be pacifists, and operated the Friends Ambulance Unit (FAU)  during both of the world wars.
Member of the Friends Ambulance Unit.  Source: Wikipedia
I've decided to roll this knowledge into my Kelso scenario.  Troops within a certain distance of the meeting house will potentially be delayed or even put down their arms as they listen to the pleas of the Quakers to stop the violence.   Doc will also run a first aid center out of the complex, providing help to both sides.  Perhaps for Christmas, I'll get some more Quaker medical teams added who can roam the board. 


 So the final product doesn't look exactly like reality (my apologies to anyone from Kelso) , but overall I think it will give the feel that I'm looking for.
Reality
Fantasy

Sunday, June 23, 2013

Petrol Station and Garage

The second building I completed this weekend was the Garage kit T017 from Scalescenes.com.


This is a very simple kit and easy to build (I did it in an afternoon), but you get a lot of bang for your effort. You have a variety of shop names to choose from, and you can make it a BP, Shell, or Esso station. However, what I really like is the interior detailing.

For the interior of the garage, you almost need to do a double take to make sure you are actually looking at a model; there are even tire mark on the floor.

Finally, the Lledo cars even fit, which is great.

Overall, one of the easiest kits I've build from the series, and I love how good it looks for such minimal work.  Needless to say, control of the fuel will be a major objective of my VBCW games.

Terraced Houses

The kids have been off visiting the in-laws this week, so it's been a good time to knock out some buildings.  First up is Terraced Houses kit T020 from Scalescences.com.

Front of the homes with flowers added to the garden area (flowers not part of the kit)

Rear of the homes
This is the largest of the kits I have built so far.  Scaled up 120% to 1/63 size, it  is about 20cm high and almost 30cm deep. With the exception of the bay windows, which are a bit fiddly, it wasn't too difficult of a build (about a 1 1/2 weeks of evenings).  However, expect your hands to get sore cutting, as there are a lot of pieces.

To add variety, the building comes with the usual section of doors and window dressing, and you can rotate the sidewalk 180 degrees if you want the tile/brick work in the back instead of the front. If you so desire, the kit can be attached to the corner shop kit and shopfronts from that kit can be used on this building as well.

Diecast Vehicles for VBCW Part V

Bought another car this week:

Lledo DG 18000 1936 Packard  U.K. Ambulance

I am unable to locate a photo of the real vehicle for comparison, but I think it looks good with the figures.

Sunday, June 9, 2013

Kelso Local Defense Volunteers

The first of my Local Defense Volunteers (LDV) to help defend Kelso from the fascists:

Retired WWI vet and and "Doc", a member of the First Aid Party (FAP)

Sue of "Sue's Cafe" and a light machine gunner


View of the arm bands
 There are figures from Artizan's Thrilling Tales line.  My vet is wearing a Victory Medal, British War Medal, and 1914 Star. Doc was actually a member of the French resistance, but since I don't plan to use suitcase bombs in my game, I decided he would make a good medical officer.  Sue was a French maid (hence the shorter shirt), but I though the apron would make for a great cafe owner who doesn't want to serve tea to any blackshirts. The armband on the machine gunner mimics one from 1940 as seen in Osprey's, "The British Home Front 1939-45." Lettering was done using rub off transfers from Woodland Scenics.

Monday, June 3, 2013

Diecast Vehicles for VBCW Part IV

Another couple of vehicles arrived today.

Lledo DG 029  1931 Rolls-Royce Phantom II

Lledo DG 025 1925 Rolls-Royce Silver Ghost Tourer

Compared to the Model A Truck

Size-wise they seem to fit fairly well, though perhaps slightly small for the larger Artizan miniature.  Let's check against real life examples.


Source:  Flicker
This is a 1931 Phantom II Limousine.  As you can see, the gentlemens' heads are going to be at or slightly above the roofline.  So I would say even though the Lledo Phantom seems slightly small at first compared to the Artizan figure, it's actually not a bad match.

Source: Wikimedia Commons
 Here is a 1925 Silver Ghost Torpedo.  Unfortunately the only person standing right next to it is a girl, but the adults in the background appear as if their heads would be at or slightly below the roofline.  So I would say the Lledo car is about right for the Artizan figure and maybe slightly big for the Musketeer figure.

Sunday, May 19, 2013

Flower Containers

So I plan to set my VBCW battles in Kelso, which blocks off the pedestrian area of the town square with large flower containers:
Source: ahume.co.uk
I don't know if such containers were present in the 1930's, but I'm going to include them as they look nice and would provide some cover when fighting in the square.

To go about recreating these, I picked up some 3/4" metal pipe crimp rings from the local DIY store.  It was about $5 for a pack of 10, and I like the heft they have.

 To fill in the bottoms, I cut out some circles from cereal box card and glued them into the bottoms of the rings.  The exposed card was painted brown, and the rings were wrapped with concrete texture paper from Scalescenes.com.
The insides of the containers were then coated with glue, and flowers from Wee Scapes were trimmed to appropriate sizes and added.  Finally, they will be sealed with matte spray varnish.

They are a bit undersized compared to the real things, but  my model square is going to be compressed in size,  so I think they'll work out great.

Saturday, May 18, 2013

Hedge Rows

During my lunch break today, I took a stroll through a local craft shop and found this in the dried flowers section:

I have been wanting to make some hedge rows for a while, and this seemed like potentially good material.  The rolls are produced by a company called Panacea, and come in 36" (91.4cm) lengths, of either 3" (7.6cm) or 6" (15.2cm) widths. The rolls appear to be made of synthetic brown threads coated with a fine textured natural moss that gives the impression of small leaves. I grabbed the 6" roll, which was $12.99, along with a rough foam block to cut down for the hedge cores.

I cut the block down to strips that are 6" long and 2" high. These were given a base coat of dark brown craft paint, then dry brushed a light green:
I spread wood glue on the outside and covered them with strips from the moss roll.  The rolls have some holes in them, so patching was required.  The moss roll is naturally springy and wanted to pull away from the foam core, so I had to compress the hedge under some medium weight books to get good adhesion.
The moss was shedding fairly heavily off the hedge, so I decided to coat it with a generous amount of Krylon low odor spray glue.  This seems to have solved the issue. Finally it was sealed with a spray matte varnish to dull the shine from the glue.

They aren't the fanciest of hedges, but for a quick, cheap terrain piece, I think they actually look pretty good.    

Friday, May 17, 2013

Diecast Vehicles for VBCW Part III

Another set of vehicles arrived today (my last order for a bit):
  1. Lledo DG 043 1931 Morris Van
  2. Lledo DG 013 1934 Model A Ford Van
The Morris van arrived in a new box type, but as you can see, it has the same dimensions as the one seen in Part II of this series.
Both vehicles look reasonable with the miniatures, with the door tops around head height or slightly higher.

Comparison with the Ford truck:
Again, they all seem similar in scale.

 I could not find a photo of this particular Morris van, but here is a 1930 box van:
Source: Grace's Guide
 It looks like the door tops would be head height, which matches my van.

Here is the Model A Van:
Source: Motorstown.com
Sadly there is only a child in the photo, but I would guess that the door tops would be slightly lower than adult head height.  Looking at a photo of a Model A sedan, this seems likely:
Source: imcdb.org
So I would say the Model A is a good fit for 28mm miniatures, perhaps even slightly oversized.