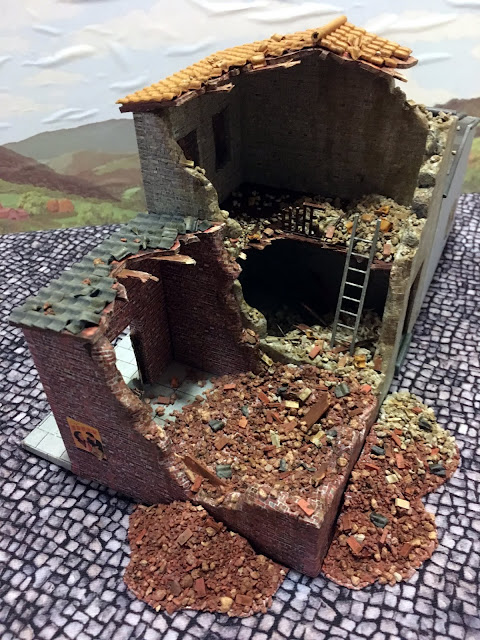
I hadn't attempted battle damaged buildings before, so I decided it was best to start with a half size block in case it all went sideways as I figured out how to approach it. As such, this is just a straight row of three buildings, with two of them having suffered an artillery blast to the rear.
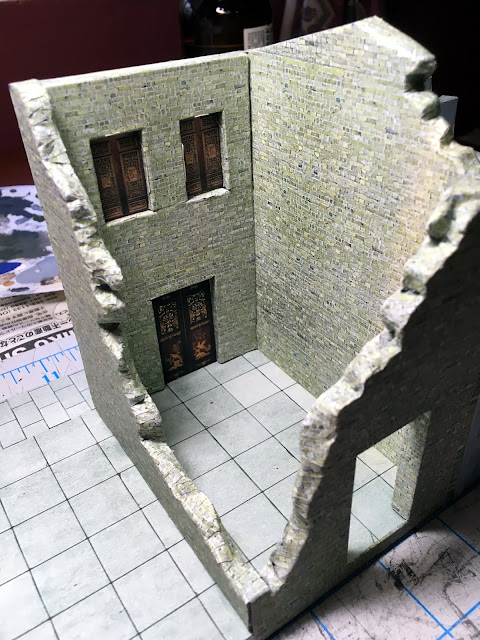
As with the previous builds, the buildings were created by wrapping texture paper around high density hobby foam. For the damaged edges, I cut the foam at rough, irregular angles, then painted them an appropriate base color. The brick patterned paper was cut into fingers, for lack of a better term, and wrapped over the edges using white household glue instead of glue sticks. I chose white glue for the higher water content, which allowed the paper to soften and warp so it better shaped over the edges. I used this finger technique on both sides of the walls, allowing the paper to overlap and hide as much of the foam as possible.
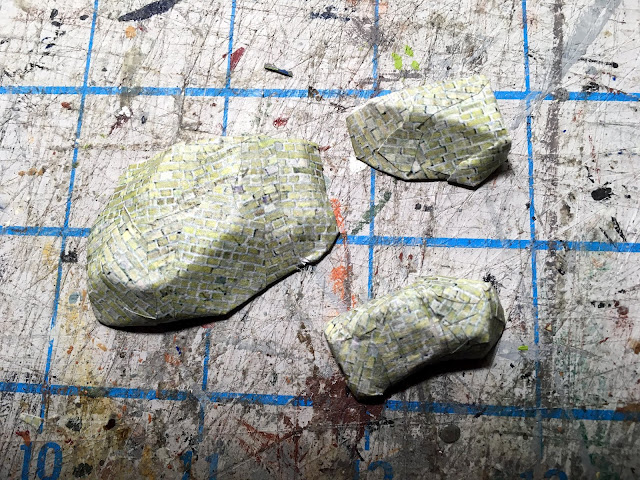
To create the rubble piles, I started with bits of scrap foam and used the same paper application system I used on the walls. The only major difference is I cut the brick paper into small, irregular shapes and applied them at odd angles to keep from getting a uniform brick pattern. These were then glued into place.
Atop the rubble bases, I applied a debris mixture of small rock obtained from the model train shop and 1:48 bricks produced by Juweela. To help with the blending of the materials and the paper texture, everything was given a wash with diluted paint of an appropriate color. The rubble bases were then given a thick coat of white glue and the debris sprinkled over the top. After this dried, a coating of Woodland Scenics' scenic cement was added for additional durability.
As before, I used appropriate looking advertising and signage to give it a period feel.
This is a Chinese herbal pharmacy using elements I photographed at the Hong Kong Museum of History.
A restaurant sign from one of the older neighborhoods in Kowloon.
Trying to get the damaged roofs looking irregular was one of the more challenging aspects for me. The base was thick card that needed to be cut with an X-acto blade, so it was difficult to create broken looking edges. To help hide this, I covered both the top and bottom with a printout of a roof underside, trimmed the tiles irregularly with some out of alignment, and glued broken coffee stirrers where beams would be. The edges were dry brushed with a warm tan to approximate raw wood, and everything was washed with Secret Weapon dark sepia to give it a bit of a scorched look.
Here are some better views of the rear so you can see the extent of the damage. To give a little more color pop to the rubble piles, I also included some broken tile and wood bits in addition to rock and bricks.
I wanted access to the upper level, so added a section of ladder cut from Plastruct O Scale ABS Ladder.
For a more authentic look, I felt the rubble needed to spill out of the buildings and onto the streets. However, I was worried about the rubble breaking off during storage and transport, and also wanted the flexibility to remove the rubble to allow the buildings to sit against another block. As such, I made independent piles that could be pushed up against the walls and stored inside the pharmacy when not in use. They ended up not being perfectly flush with the walls, but I think they still look good overall.
This first test build came out better than I expected, so I'm feeling a bit more comfortable attempting ruins. My next goal for the project will be to complete a sandbag bunker in a damaged building. We'll see how it goes.


Impressive work!
ReplyDeleteVery nice! It's always good when things come together first go.
ReplyDeleteStunning job.
ReplyDeleteVery realistic and well finished.
ReplyDeleteExcellent work, and the spilled rubble really sells it as a destroyed building.
ReplyDeleteLooking awesome sir!
ReplyDeleteGreat job. Very effective.
ReplyDeleteGreat job!
ReplyDeleteLooking splendid!
ReplyDeleteYour work is fantastic and very clever, thanks for sharing I am really enjoying learning how you created these.
ReplyDeletethese building look AMAZING
ReplyDelete